Sunday, April 28, 2013 at 11:14 PM
Posted by Vivian in
Beef,
Korean
At a recent get together with my bunch of girlfriends, I finally got to try the Korean Rice Cake after having seen it being served in countless k-drama. The one that we had was probably not very traditional, as it was topped with Mozzarella cheese and baked to a golden hue. Traditional or not, it had a nice chewy texture to it.
Not long after that dinner, I spotted packets of frozen Rice Cake on display at the supermarket which I frequent. Without much thought, I took home a pack but it ended lying in the freezer for weeks waiting for the day when I am in the mood to make something out of the usual menu. Fortunately, I did get to it even before the Rice Cake expired.
Because the kids are not used to taking spicy food, I decided to randomly search for recipes hoping to find one that is non-spicy. The cyberworld didn't disappoint me and it didn't take me very long to chance upon one
here. The recipe looked promising from the fact that it was one passed down from generations within a Korean family. There is no way one can go wrong with that!
I made a minor tweak when cooking the beef though since I had used beef flank which is the cheapest cut available at the supermarket. Not because I was on a tight budget but rather I had discovered that no matter how bad the cut is, stir-fried beef can still turn out tender when done using the velveting method. I read some years back that velveting is how Chinese restaurants whipped up nice tender stir-fried beef and since then I never bothered to splurge on beef to be used for stir-frying.
Ingredients:
- 1 pack of Korean Rice Cake
- 350gm of beef (cut into thin strips)
- 1 stick of carrot (julienned)
- 1 medium sized onion (cut into thin wedges)
- Few stalks of spring onion (cut into 2 inches long)
- 1 teaspoon of minced garlic
- 1 teaspoon of crushed sesame seed
- Half an egg white
- Cornflour
- Light soy sauce
- Sugar
- Sesame oil
- Grounded black pepper
Preparation:
- Marinate beef for 30 minutes to 1 hour with:
- Minced garlic
- Crushed sesame seeds
- Egg white
- 2 teaspoons of cornflour
- 1 tablespoon light soy sauce
- 1 tablespoon sugar
- 1 1/2 teaspoons sesame oil
- A dash of black pepper
- Soak Rice Cake with cold water and thereafter parboil for 2 minutes or until soft and chewy taking care not to overcook. Run Rice Cake under cold water after removing from boiling water.
- Mix 1 tablespoon of sugar, 1 tablespoon of light soy sauce and 1 tablespoon of sesame oil in a bowl. Set aside to be used as finishing sauce.
- Heat about 4 to 5 tablespoons of oil in wok using high heat. Add beef to wok and quickly stir-fry for 30 seconds or until the beef is nearly cooked and still showing bits of pink. Remove beef from wok and set aside. Allow additional oil to drain.
- Reheat wok with some oil and sauté onion and carrot. Season with salt and pepper.
- Add Rice Cake into the wok together with the beef. Mix well and allow mixture to cook for a minute.
- Pour in finishing sauce and spring onion.
- Remove from heat when well-coated.
Number of Servings: 5 to 6

Monday, October 1, 2012 at 10:35 PM
Posted by Vivian in
Snacks
While this is not an overdue post, it is something which I head meant to do with Elaina weeks ago. I finally made good my overdue promise last weekend.
The first time I came across this recipe was from some children recipe book 7 years ago. I attempted it twice and filed it away. Despite the fairly simple to follow steps, I couldn’t work out why the chocolate coating wouldn’t set even though I had followed the recipe to a T. I recall I had to put the entire batch into the freezer just to get the chocolate to harden (when the fridge didn’t do the trick!) and even then within minutes, the chocolate would melt promptly into a big mess. We had to literally “eat out from the freezer”.
Recently, I had to review a video clip of a cooking show segment for work reason and learned the following tricks of melting chocolate:
- Don’t let water mix with the melted chocolate. Otherwise the chocolate seizes and results in a grainy consistency. Quite honestly, I haven’t “tried” this myself yet and am unable to fully comprehend the full meaning.
- Tempering chocolate gives the chocolate its shiny appearance and will snap crisply when broken. I suspect that my attempts 7 years ago were a flop because I had failed to temper the chocolate, but I could be wrong because based on the theory I read, it will affect the appearance eventually but nothing had been said on affecting the chocolate setting process.
I started to dig through the cyberspace thereafter and learned that for coating purpose, even the usual chocolate bar can be used as long as it does not contain added ingredients like nuts, fruits or wafers. I had been living with the wrong impression that only baking chocolate works.
So whatever the case was, I felt brave to give it another go and see if I can make this work now that I am armed with these tips. My bravery didn’t let me down, but unfortunately with our hot and humid tropical weather, the Rice Bubble Ball won’t hold up for too long if left sitting on the table just like most chocolates. Still, I think that I had done much better now as compared to then. Just need to make sure these are consumed within 15 to 20 minutes after getting them out of the fridge.
Elaina had a lot of fun making these with me. Definitely an easy recipe for kids if they want to do something in the kitchen while still allowing the parents to contain the mess.
Ingredients:
- 2 blocks of white, dark or milk chocolate (2 tablets of Cadbury Diary Milk was used in my recipe)
- 1 box of rice bubbles
- Hundreds and thousands for decoration
Preparation:
- Using a double boiler or a saucepan, bring small amount of water to simmer (never boiling).
- If using a saucepan, place a glass bowl over such that it sits nicely over the saucepan. The water should not be touching the base of the glass bowl
- Add 2/3 of the chocolate into the glass bowl. Breaking the chocolate before adding it in will speed up the melting process.
- Stir continuously until the chocolate melts completely.
- Remove glass bowl from heat and add in remaining chocolate.
- Continue to stir till the chocolate melts.
- Pour in rice bubbles and mix well with the melted chocolate. (Add in half a bag first and gradually add more in so as to ensure that there is sufficient chocolate to coat well in case there is way too much rice bubbles as opposed to chocolate).
- With the help of 2 teaspoons, scoop rice bubbles into mini cupcake liners.
- Top with Hundreds and Thousands.
- Leave the already coated rice bubbles in the fridge for the chocolate to set
Number of Servings: 50 to 60
Monday, September 17, 2012 at 10:42 PM
Posted by Vivian in
Potatoes,
Seafood
It has been a while since I experiment with anything that requires deep-frying and I am going to use the same excuse again – because I simply do not have extra time to while away in the kitchen.
Last Sunday was one of those rare occasions when I didn’t have anything else on my plate, no extra chores to take care of and no places that I need to run to. So I decided to give this prawn croquette recipe a try. I think I spent a grand total of 3 hours in the kitchen on the preparation, cooking and washing. This may sound really funny to most people, but being able to spend the time how I want to without feeling the pressure is a luxury to me.
Even though I ended up with sore legs, it was a 3-hour well worth spending because I got the thumbs up sign from both kids. Hopefully the next time when I get to soak myself in the kitchen for a straight 3 hours won’t be too far away.
This is a close adaptation to the recipe from
Wokkingmum. Instead of using salt, I had added salted butter when mashing the potatoes for a smoother consistency and also to ensure a more even out taste (in case the salt doesn’t get mixed well enough), and the final coating was replaced with panko only because I like the colour that panko produces after deep-frying. Parmesan cheese was omitted from my recipe and mozzarella cheese was added instead as it melts beautifully in my opinion.
Ingredients:
- 20 medium size prawns (deveined, head and shell removed with tail left intact)
- 1 kg of potatoes
- Half a bar of salted butter
- Shredded mozzarella cheese (estimated to be about 3 tablespoon heaps)
- 1 egg (beaten)
- Plain flour
- Panko
Preparation:
- Boil potatoes for about 25 mins till soft.
- Peel off potato skin and mash well with butter.
- Make 3 to 5 horizontal slits across the underside of each prawn (this is to prevent the prawn from curling up during the cooking process).
- Blanch the prawns until it is almost cook..
- Place a small clump of the mashed potatoes in the palm, top with cheese and prawn. Add on another small clump of mashed potatoes and mould well using hands ensuring that the prawn is well covered with potatoes except for the tail. Repeat process for each prawn.
- Coat each croquette with plain flour first, followed by egg and lastly with panko.
- Fry croquette until golden brown.
Friday, August 24, 2012 at 11:40 PM
Posted by Vivian in
Egg,
Japanese
It is not an exaggeration if I say that making this egg is akin to precision engineering. From getting it to the right consistency to removing the shell off without nicking it is no mean feat. Ensuring the yolk stays runny and not overly cooked but yet getting the white hard enough such that it doesn’t get mangled when de-shelling is an intricate balance.
I have been trying to prefect it but there are obviously still much room for improvement. If I do get it right, then I believe it is because of some divine intervention. Ploughed through quite a few sites to look for some tips and tricks. Unfortunately, I have not uncovered any magic. Everyone seems to be working with the same recipe. Am I missing something or most people just don’t bother whether the egg white stays whole? Perhaps it is high time for me to come to terms that “it is the inside that counts” and nothing else matters.
Luck was on my side last weekend with one particular egg out of the seven I made. It was decent looking enough for me to have it featured in the photo above. And so after more than 50 eggs and a good one and a half year of attempting to perfect my skills for this recipe, I am finally writing down what I think might work. Probably will still need a few attempts to convince myself that this is it!
Ingredients:
- 7 to 8 medium size eggs (cold and just out from the fridge!)
- 8 tablespoons of light soy sauce
- 6 tablespoons of water
- 6 tablespoons of Mirin
- 4 tablespoons of Sugar
- 2 tablespoons of dark soy sauce
Preparation:
- Bring to boil a pot of water enough to cover eggs.
- Reduce heat until the water is just bubbling.
- Lower eggs gently into water using the help of a ladle.
- Allow the eggs to boil for 9 minutes (most recipes call for 6 to 8 minutes but I find that even for 8 minutes the egg white is too soft to allow the shell to be easily removed).
- Remove eggs and immediately place them into an ice bath.
- Transfer the eggs in the ice bath to a fridge and let it sit for 3 to 4 hours.
- In the meantime, combine all remaining ingredients in a pot and bring to a simmer. Allow marinade to cool.
- Once the eggs are done with the "ice bath", make a small crack on one end of each egg and place the eggs back to the water for 1 to 2 minutes. I personally find that this allows the water to seep through between the shell and the egg, so that the shells remove much easier.
- Remove shells from egg.
- Marinate the eggs with the marinade overnight and turn the eggs at least once or twice during the process to ensure the eggs are evenly coated.
- Before serving, remove the eggs from the fridge and allow the eggs to warm up room temperature.
- Drain and halved the eggs.
Monday, August 6, 2012 at 11:21 PM
Posted by Vivian in
Chinese,
Noodles,
Seafood
One miserable post for the year thus far… that’s truly a record low!
Planning a meal has been quite a challenge this year. Being pressed for time on most days is only but one reason. Logistic arrangements, from transportation for grocery shopping to other activities taking priority on most weekends, complicate matters as well. So it has been “back to basics”, and nothing fancy has came out from the humble kitchen of mine for many moons now. I used to bookmark interesting recipes and will attempt to get to it when I find the opportunity to. Convinced myself to stop doing that because it will only make me more depress with an ever growing list, as if a promise made to own self that I couldn’t keep to.
Even the recipe below is nothing terribly exciting - same recipe for
Hor Fun except for some very slight changes. At the very least, it satisfy myself that I won’t end the year with only one entry!
Ingredients:
- 5 pieces of crispy noodles
- 200 gm of lean pork or chicken fillet (sliced)
- 1 medium size squid (sliced)
- 2 fish cake (sliced)
- 15 medium-sized prawn
- 1 bunch of choy sum
- 4 cloves of garlic (diced)
- 5 cups of chicken stock
- Oyster sauce
- Light soy sauce
- Sesame oil
- 2 eggs (lightly beaten)
- Cornstarch (4 tablespoons of cornflour mixed with a small bowl of water)
- Cornflour
Preparation:
- Marinate both chicken/pork and prawns with corn flour, sesame oil and light soy sauce.
- Heat up oil and stir-fry garlic.
- Add chicken to pan and stir-fry until it is almost done and add in prawns and squid.
- Remove ingredients from pan when cooked.
- Add chicken stock, 2 tablespoons of oyster sauce and 2 tablespoons of light soy sauce to pan. Bring to boil.
- Add in choy sum and fish cake.
- As soon as the choy sum is cooked, lower heat and add in cornstarch and bring to boil.
- Once the sauce thickens, return all ingredients back to pan.
- Turn off heat and stir in beaten egg.
- Dish gravy over noodles.
Number of Servings: 5
Sunday, February 19, 2012 at 10:57 PM
Posted by Vivian in
Chicken
Finally, finally, finally I managed to try something new after taking a good few months break since the last posting... even that was more like an improved version of an earlier dish. I foresee that this year will be another unproductive year in this regard, with the family into a new routine and me having lesser time than before to run my kitchen experiments. I need quick fixes when it comes to planning meals and more often than not it meant falling back to what I am already familiar with. Not to mention that I got lazy with hopping around food blogs for inspirations as well in recent months.
But I have to admit that this one caught my eyes a few weeks back - simple enough with condiments that do not require hunting around for. Slight tweaks were made to this recipe which was picked up from
NoobCook.
Ingredients:
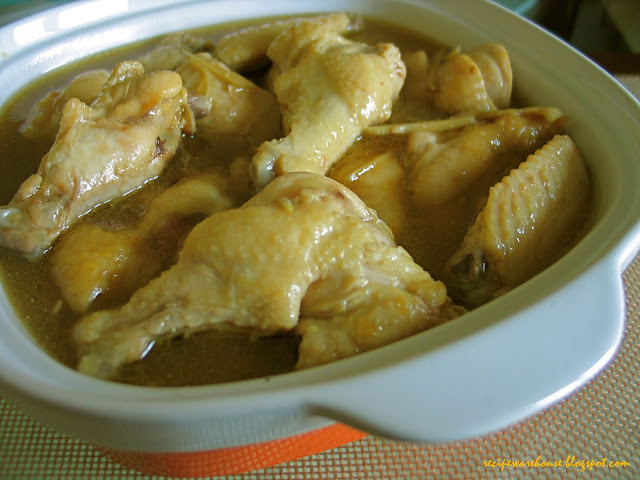
- 8 chicken wings (drumlet separated from mid-joint)
- 2 tablespoons of light soy sauce
- 1 tablespoon of dark soy sauce
- 2 tablespoons of sesame oil
- 300ml of regular coke
- 300ml of water
Preparation:
- Marinate chicken wings with light soy sauce, dark soy sauce and sesame oil overnight.
- Heat oil in pan and brown the chicken wings lightly (in batches if necessary).
- Return all the wings to the same pan or transfer to another pot.
- Add in coke, water and remaining marinate sauce to pot / pan.
- Let simmer for 20 minutes.
Thursday, October 13, 2011 at 10:47 PM
Posted by Vivian in
Chinese,
Noodles
Finally after so long, I get to put on a new posting. I seemed to be running out of luck with my photos lately and often ended up chucking the whole lot. It was either due to the lack of natural lighting or the entire composition just doesn’t look right and the photos turned out to be in a total mess. Plus, I haven’t sighted any new recipes recently to get me excited and had been working perfectly fine just recycling what I had collected in the past.
Actually this recipe is just a variation to the Ee Fu Noodles I posted on months back. Some time ago, I bought a packet of Ee Fu Noodles with conpoy that cost me $30 and could barely feed two. I was really expecting something double that size If not for the free cash voucher I bought it with, I would have let out a big and long ouch. What’s more, there were only 2 miserable dried scallops in that box of noodles. I know dried scallops are expensive but still I felt cheated.
I decided that I was too cheapstake to pay $30 bucks for something that would only cost me half the price for double that portion if I whip it up in my own kitchen. And what’s more, a recipe that is almost idiot-proof.
The only additional step to the
original recipe is to add in the shredded dried scallops with the other ingredients during the frying process. Simple as that.
6 to 7 mid-sized dried scallops were soaked overnight, and shredded using finger tips just before cooking.
 |
Dried scallop also known as conpoy is viewed as a delicacy in Chinese cuisine.
Often added to congee and soup for added flavor |
Sunday, April 17, 2011 at 10:42 PM
Posted by Vivian in
Chicken,
Chinese
Sometime back I attempted this same dish (the recipe came from some source that I cannot recall by now) which turned out to be an utter failure and got tossed out of the window... I mean the recipe not the chicken!
I guess that I wasn't passionate enough and didn't continue in my pursuit for the right recipe until recently when I got lucky and managed to find the one without much fuss.
To round up the meal, I paired the chicken off with Hong Kong style egg noodles and Choy Sum, drizzled with the sauce leftover from stewing the chicken and made it "See Yao Gai Min" (酱油鸡面)
The following recipe is adapted from
Rasa Malaysia.
Ingredients:
- 10 chicken drumsticks
- 2-inch ginger (skin peeled and lightly pounded)
- 4 cloves garlic (lightly pounded)
- 2 stalks scallions (cut into 2-inch lengths)
- 2 star anise
- 1 cinnamon stick (about 2-inch length)
- 200 ml of light soy sauce
- 150 ml of dark soy sauce
- 1 tablespoon Shaoxing wine
- 3 dashes white pepper powder
- 4 tablespoons of white sugar
- 4 cups water
Preparation:
- Add all ingredients (except the chicken) into pot and bring to boil over high heat for 15 minutes.
- Add the chicken into the pot and boil over high heat for another 10 minutes.
- Lower the heat and allow to simmer for about 30 minutes.
- If possible, leave chicken in the soy sauce mixture for at least an hour to soak in the flavor.


.JPG)


.JPG)


