Sunday, April 17, 2011 at 10:42 PM
Posted by Vivian in
Chicken,
Chinese
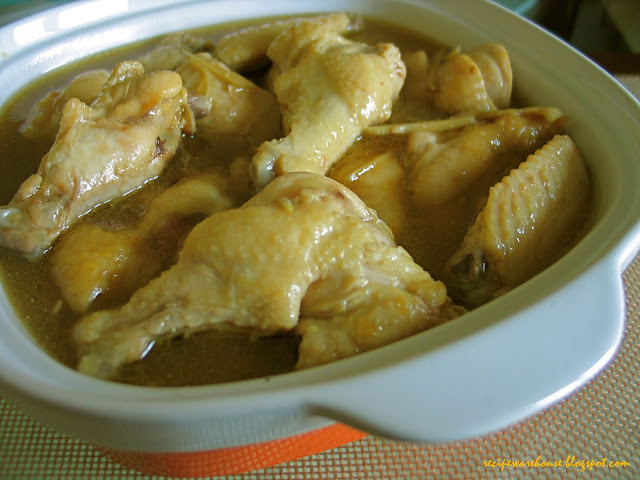
Sometime back I attempted this same dish (the recipe came from some source that I cannot recall by now) which turned out to be an utter failure and got tossed out of the window... I mean the recipe not the chicken!
I guess that I wasn't passionate enough and didn't continue in my pursuit for the right recipe until recently when I got lucky and managed to find the one without much fuss.
To round up the meal, I paired the chicken off with Hong Kong style egg noodles and Choy Sum, drizzled with the sauce leftover from stewing the chicken and made it "See Yao Gai Min" (酱油鸡面)
The following recipe is adapted from
Rasa Malaysia.
Ingredients:
- 10 chicken drumsticks
- 2-inch ginger (skin peeled and lightly pounded)
- 4 cloves garlic (lightly pounded)
- 2 stalks scallions (cut into 2-inch lengths)
- 2 star anise
- 1 cinnamon stick (about 2-inch length)
- 200 ml of light soy sauce
- 150 ml of dark soy sauce
- 1 tablespoon Shaoxing wine
- 3 dashes white pepper powder
- 4 tablespoons of white sugar
- 4 cups water
Preparation:
- Add all ingredients (except the chicken) into pot and bring to boil over high heat for 15 minutes.
- Add the chicken into the pot and boil over high heat for another 10 minutes.
- Lower the heat and allow to simmer for about 30 minutes.
- If possible, leave chicken in the soy sauce mixture for at least an hour to soak in the flavor.

Monday, March 21, 2011 at 11:35 PM
Posted by Vivian in
Chinese,
Pork
Since the last post on
wantons, I have gone on to make this repeatedly and experimented with different tweaks by adding different ingredients or condiments. By far this are the best tweaks combined to deliver the best result:
Tweak #1 - Instead of cooking the wantons in a big pot of soup, use chicken broth. The wanton skin takes on a different flavour.
Tweak #2 - Add minced shrimp to the minced pork for a better bite. Mix well and preferably with (clean) hands in a kneading motion.
Tweak #3 - Replace ginger water with concentrated chicken stock.
Monday, March 7, 2011 at 11:14 PM
Posted by Vivian in
Seafood
I have been doing some "sitting on my butt" for way too long. This was supposed to have made its way here before Lunar New Year was over, obviously it didn't quite happen. Days, turned into weeks and weeks into a month. My mind has been preoccupied lately with battling stuff and unfortunately people, and it leaves me completely drained. Plus the house is falling apart with things turning wonky all at the same time. Well... at least the Daikin folks are taking much longer to fix the air conditioner than me getting this entry up.
Anyways, back to this dish with a auspicious-sounding name that describes nothing but spring (which by the way I also found out that there are many other dishes out there with the same Chinese name but boy do they all look different!). Obviously, this was deliberately dished out with Chinese New Year in mind and also because I bought a can of pacific clams and wanted to make something different other than pouring the whole can into a big pot of soup. So I bought a bag of scallops to go with the pacific clams... think buying a dress to pair up with the shoes.
If you ask me, the taste didn't quite wow me. It tasted almost like this
shrimp and broccoli dish. Probably because I was hoping for something very different. Almost like a mismatch of expectation and reality.
Ingredients:
- 1 can of pacific clams
- 15 pieces of fresh scallops
- 1/3 stick of carrot (thinly sliced or cut into flower shape)
- 1 bunch of broccoli (stem removed and cut)
- 5 cloves of garlic (minced)
- 3 slices of ginger
- 2 stalks of spring onion (ends only)
- 1 teaspoon of Shaoxing wine
- 1 cup of chicken broth
- 1 tablespoon of oyster sauce
- 1 tablespoon of light soy sauce
- 1 teaspoon of sesame oil
- Corn starch (100ml of water mixed with 1 level tablespoon of cornflour)
Preparation:
- Blanch broccoli and set aside.
- Saute garlic (half of above indicated quantity), ginger and spring onion with a little bit of oil until fragrant
- Sprinkle with Shaoxing wine and add in chicken broth.
- Once the mixture starts to boil, add in scallops and allow to cook for about 2 minutes.
- Drain and remove scallops, Set aside for later use.
- Using a clean pan, stir-fry the remaining minced garlic.
- Add carrot to the pan and when it is half done, add in pacific clams.
- Stir-fry mixture until thoroughly cooked.
- Mix in oyster sauce, light soy sauce and sesame oil.
- Return into the pan.
- Turn the heat down and add in cornstarch.
- Let simmer until the sauce thickens.
- Transfer to serving plate and garnish with broccoli.
Number of servings: 4 to 5
Sunday, February 6, 2011 at 10:42 PM
Posted by Vivian in
Chinese,
Tofu
I personally find that the hardest dishes to get to perfection are usually the simple fanfare. Take for instance, frying an omelette to the perfect hue and flipping it over without breaking the egg apart, or making an onsen tamago with the right consistency - runny yolk with harden egg white, and peeling the shell off without nicking the egg (a separate post will be dedicated to my onsen tamago soon).
Egg aside, my main lead for this post is just as bad. Getting the tofu out of its packaging in one whole piece without breaking a corner off is harder than stir-frying sliced beef to the right doneness! Unfortunately, the tofu didn't turn out to be as presentable as I had pictured as a result, but at least I wasn't disappointed with the taste.
This recipe was inspired by my mum. It was one of those quick-fix dish that she fed me and my siblings with when we were little. No fuss, low budget but full of proteins. I tweaked it a little by making a base sauce to go along with the tofu, but otherwise it is still fine on its own.
Ingredients:
- 1 box of tofu (either sliced into 8 pieces or used as it is)
- 100 gm of minced meat (pork of chicken works fine)
- 1/2 tablespoon of light soy sauce
- 1 teaspoon of cornflour
- 1 teaspoon of sesame oil
- 2 cloves of garlic (minced)
- 1 packet of Shimeji mushroom (roots removed and separated)
- 150 ml of chicken broth or water
- 1 tablespoon of oyster sauce
- 100 ml of cornstarch (100 ml of water with 1 tablespoon of cornflour)
Preparation:
- Marinate minced meat with light soy sauce, sesame oil and cornflour for at least 30 minutes.
- Spread the minced meat evenly on top of tofu.
- Steam tofu for 10 minutes or until the minced meat is thoroughly cooked.
- In the meantime, heat 1 tablespoon of oil in frying pan and add in garlic.
- Add mushroom to pan and stir fry until well-cooked.
- Pour in oyster sauce and chicken broth and mix well.
- Lower the heat and drizzle in cornstarch. Let simmer until the sauce thickens.
- Once the tofu is done, remove from steamer and transfer to serving plate.
- Ladle sauce over tofu and serve.
 |
Steamed Minced Meat on the spoon for someone who thinks that he will get poisoned for eating tofu!
And the kids asking that I take a photo of them with the minced meat..... |
Sunday, January 9, 2011 at 11:21 PM
Posted by Vivian in
Chicken,
Japanese,
Rice
For my life, I can't remember when was the last time I made Oyako Don. At one point I was whipping this so often that I could do it with my eyes close. Revisited what I posted 2 years ago to look up the recipe and realised that the photo was utterly crappy and I didn't revise the post to record the tweaks that I had made to the original recipe. Gosh!
So here it goes again....
Ingredients:
- 3/4 cup dashi
- 2 tablespoon sugar
- 4 tablespoon mirin
- 4 tablespoon light soy sauce
- 1 onion (sliced thinly)
- 4 chicken thigh (cut into bite size pieces)
- 4 eggs (break up yolks using chopsticks with a with zig-zag motion)
Preparation:
- Mix the dashi, sugar, mirin, and soy sauce. Divide into four portions.
- In a small frying pan, heat up one portion of the mixture together with the onion.
- Add chicken thigh in the pan as the sauce heats up.
- Cover the pan and let the chicken cook.
- Pour the eggs into the pan and let simmer until egg is 90% done.
- Slip the entire mixture from the pan onto a steaming bowl of rice.
- Top with seaweed or spring onion if desired.
Number of servings: 4
Sunday, January 2, 2011 at 10:33 PM
Posted by Vivian in
Pizza
About 2 over months ago, we brought the kids out for dinner at Bakerzin because Matty was hammering for pizza and Elaina just wanted mushroom pasta. We managed to convince Matty that the pizza at Bakerzin is rather different from the usual ones and that he will not regret giving it a try. Sure enough, he chomped up the entire plate of pizzas but unexpectedly, he asked if I could make the same at home.
I took on the challenge and decided to give it a go with my trusted frozen prata dough (my preferred option over puff pastry dough just only because I don't need to roll it and it is in the right shape!). That following weekend, my cover version of Bakerzin flaky pizza was born. Didn't blog about it or took any photos back then because I was still in my "no-mood-for-anything-and-feeling-frustrated-from-my-lack-of-voice-quality-after-thyroid-surgery" mode.
So 2 months later, I am glad that I made this again today. Initially I was disappointed that the supermarket had ran out of my favourite plain frozen prata and had to settle for the onion flavoured prata dough of the same brand, but it turned out to be a pleasant surprise because the crust had a very nice flavour to it in the end.
Now I am contemplating of using a proper puff pastry dough next time just to see the difference... but that will be a while more since I have been feeling very sick from eating all the rich food this holiday season.
Ingredients:
- 1 frozen prata dough
- Toppings for pizza as desired (mushroom, ham, parsley and shredded mozzarella cheese was what I used today)
Preparation:
- Preheat oven to 180 degree Celsius, fan forced (somehow it puffs the dough better in my opinion)
- Lay prata dough on a cookie pan or pizza pan, dusted with some flour. I usually lined it with a piece of foil and it works perfectly well.
- Place prata dough in oven.
- 5 mins later, the dough will start to balloon. Use a fork to make a small tear on the top to let the air escape. The dough will gradually deflate.
- Let dough bake for another 10 minutes.
- Remove crust from oven. Keeping the crust on the same pan and top with desired toppings.
- Return pizza back into the oven.
- Bake for another 15 minutes or until cheese turns golden brown (if cheese added as toppings).
Number of Servings: 1
Monday, December 13, 2010 at 11:34 PM
Posted by Vivian in
Chinese,
Mushroom,
Noodles
I need to declare that there is a shortage for chives in the market right now because it took me 2 trips to 2 supermarkets before I laid my hands on a bunch... and it was the last packet left on the shelf. Tough luck to the person who came after me... whoever he or she is. I can't believe that this is happening to me even after lowering my expectations and willing to settle for chives instead of yellow chives (which is really what this recipe calls for).
Despite replacing the yellow chives with chives, the taste is still close enough and I really couldn't tell the difference. At least to me... I didn't think it was a great deal even though I had deviated from the original recipe.
Ingredients:
- 3 pieces of Ee-Fu noodles
- 100 gm bean sprouts (head and tail removed)
- 2 packets of enoki mushrooms (pulled and separated apart)
- 8 pieces of fresh shitake mushrooms (stalk removed and sliced thinly)
- 5 stalks of yellow chives (julienned diagonally across about 1 inch long)
- 3 to 4 cloves of garlic (minced)
- 4 tablespoons of oyster sauce
- 1/2 tablespoon of sugar
- 1/2 tablespoon of Shaoxing Wine
- 2 cups of chicken broth
- Dark soy sauce
Preparation:
- Combine oyster sauce, sugar, Shaoxing wine and chicken broth to make braising sauce.
- Heat wok with 3 tablespoons of oil and 1/2 tablespoon of sesame seed oil.
- Add garlic to wok and fry briefly.
- Add in bean sprouts, chives and mushrooms and fry for 1 to 2 minutes.
- Pour in braising sauce and let simmer for another 1 to 2 minutes.
- Add Ee-Fu noodles into mixture. The noodles will start to soften due to soaking in the braising sauce.
- Slowly drizzle some dark soy sauce (about 2 to 3 tablespoons) over the noodles and stir to combine well.
- Continue to stir occasionally to ensure that noodles are evenly coated with braising sauce. Once done, there will not be much sauce left.
- Top with more chives as garnish before serving.
Number of Servings: 4
"Braised Ee-Fu noodles is a typical noodle dish served towards the end of a Chinese wedding banquet."
Sunday, November 28, 2010 at 10:38 PM
Posted by Vivian in
Beef,
Pie,
Potatoes

It has indeed been a while since an entry was made for this blog. Didn't even realise that I had taken such a long break. Too much had happened both at work and at home, zapping all ounces of energy away from me.
The thyroid surgery in October was the biggest culprit. I spent the immediate days following the operation mostly in daze, subsequently the lack of voice projection frustrated me to no end and which left me not in the mood for anything except to get through the days doing the bare necessities. The kitchen was still the place where I spent part of my weekends at. The family continued to get food laid before them but each time after whipping up a storm, I only wanted to get down to the eating part. Hopefully in the days to come I will remember to recreate the dishes that I had some success in for the last few months.
Two months on after the surgery, I thought to myself that it was probably high time for me to build up the momentum again and get back to doing other things that didn't quite fall under the "bare necessities" category. So here I am ready to bring on the the main lead of this post.
Cottage Pie was something that I had wanted to attempt to conquer almost a year ago for Christmas. I was cajoled to give it a go because a colleague of mine claimed that this is a very simple and easy to make pie, and partly because I was so inspired by the yummy Cottage Pie I had during a Christmas luncheon in office. Well, sadly it didn't happen for some unmentionable reason (think procrastination!) and so a year on, I finally cranked my engine and got moving... and I have to disagree with my colleague, because it took me 2 hours to put together the entire thing and I don't know how she could have classified this as simple. Nonetheless it was still very delicious.
Cottage Pie - a beef version of Shepherd's Pie, is typically eaten during Autumn / Winter season. After having fed the entire family with just a small portion and still had another serving left behind, I can understand why that is so. A little does go a long way.
Ingredients:
- 500gm minced beef
- 1 stick of carrot (cut into small cubes)
- 10 button mushrooms (sliced thinly)
- 2 cloves of garlic (minced)
- 1 medium-sized onion (cut into small cubes)
- 300ml beef stock (or chicken stock as substitute)
- 2 teaspoons of worcestershire sauce
- 1 teaspoon of grounded thyme (can be replaced with other types of herbs)
- 1 tablespoon of plain flour
- 5 large-sized potatoes
- 1 large knob of butter
- 4 tablespoons of milk
Preparation:
- Bring a big pot of water to boil and place potatoes in ensuring that all potatoes are covered.
- Cook potatoes till soft (about 20 minutes).
- Peel potatoes while still warm and mash potatoes with butter and milk. Set aside once done.
- Heat 1 tablespoon of oil in pan and add garlic.
- Once the garlic turns fragrant, add onion to pan and continue to stir until the onions turn translucent.
- Add carrot and let cook for about 5 minutes.
- Add button mushroom to mixture, and follow by minced beef, breaking all lumps.
- Once the beef is almost done, season with worcestershire sauce and grounded thyme. Stir to mix well.
- Pour in stock and cover pan to let simmer for 15 minutes.
- Turn on oven and set to 190 degree Celsius.
- Season with salt to taste when mixture thickens.
- Remove from heat and transfer content to a oven-proof deep dish.
- Top mixture with mashed potatoes and brush top with some melted butter.
- Using the back of a fork, create lines across mashed potatoes.
- Shove into oven and let it bake for 30 minutes, until the top browns nicely.
Number of Servings: 4
"Celery, peas, corn, tomatoes can be added as variations to this dish. Other herbs like oregano, parsley can be used to substitute thyme."


.JPG)