Monday, December 13, 2010 at 11:34 PM
Posted by Vivian in
Chinese,
Mushroom,
Noodles
I need to declare that there is a shortage for chives in the market right now because it took me 2 trips to 2 supermarkets before I laid my hands on a bunch... and it was the last packet left on the shelf. Tough luck to the person who came after me... whoever he or she is. I can't believe that this is happening to me even after lowering my expectations and willing to settle for chives instead of yellow chives (which is really what this recipe calls for).
Despite replacing the yellow chives with chives, the taste is still close enough and I really couldn't tell the difference. At least to me... I didn't think it was a great deal even though I had deviated from the original recipe.
Ingredients:
- 3 pieces of Ee-Fu noodles
- 100 gm bean sprouts (head and tail removed)
- 2 packets of enoki mushrooms (pulled and separated apart)
- 8 pieces of fresh shitake mushrooms (stalk removed and sliced thinly)
- 5 stalks of yellow chives (julienned diagonally across about 1 inch long)
- 3 to 4 cloves of garlic (minced)
- 4 tablespoons of oyster sauce
- 1/2 tablespoon of sugar
- 1/2 tablespoon of Shaoxing Wine
- 2 cups of chicken broth
- Dark soy sauce
Preparation:
- Combine oyster sauce, sugar, Shaoxing wine and chicken broth to make braising sauce.
- Heat wok with 3 tablespoons of oil and 1/2 tablespoon of sesame seed oil.
- Add garlic to wok and fry briefly.
- Add in bean sprouts, chives and mushrooms and fry for 1 to 2 minutes.
- Pour in braising sauce and let simmer for another 1 to 2 minutes.
- Add Ee-Fu noodles into mixture. The noodles will start to soften due to soaking in the braising sauce.
- Slowly drizzle some dark soy sauce (about 2 to 3 tablespoons) over the noodles and stir to combine well.
- Continue to stir occasionally to ensure that noodles are evenly coated with braising sauce. Once done, there will not be much sauce left.
- Top with more chives as garnish before serving.
Number of Servings: 4
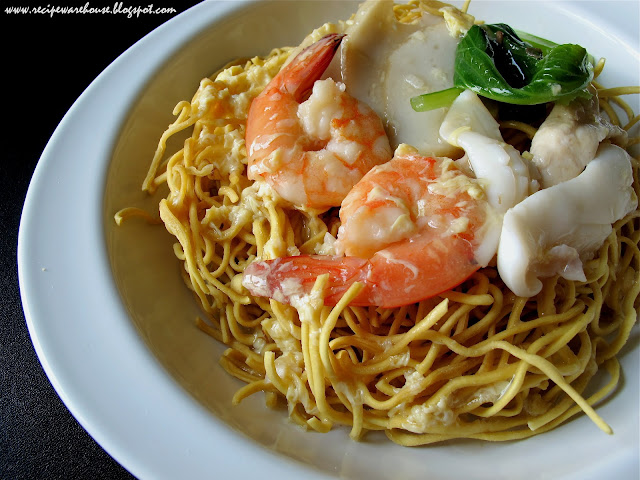
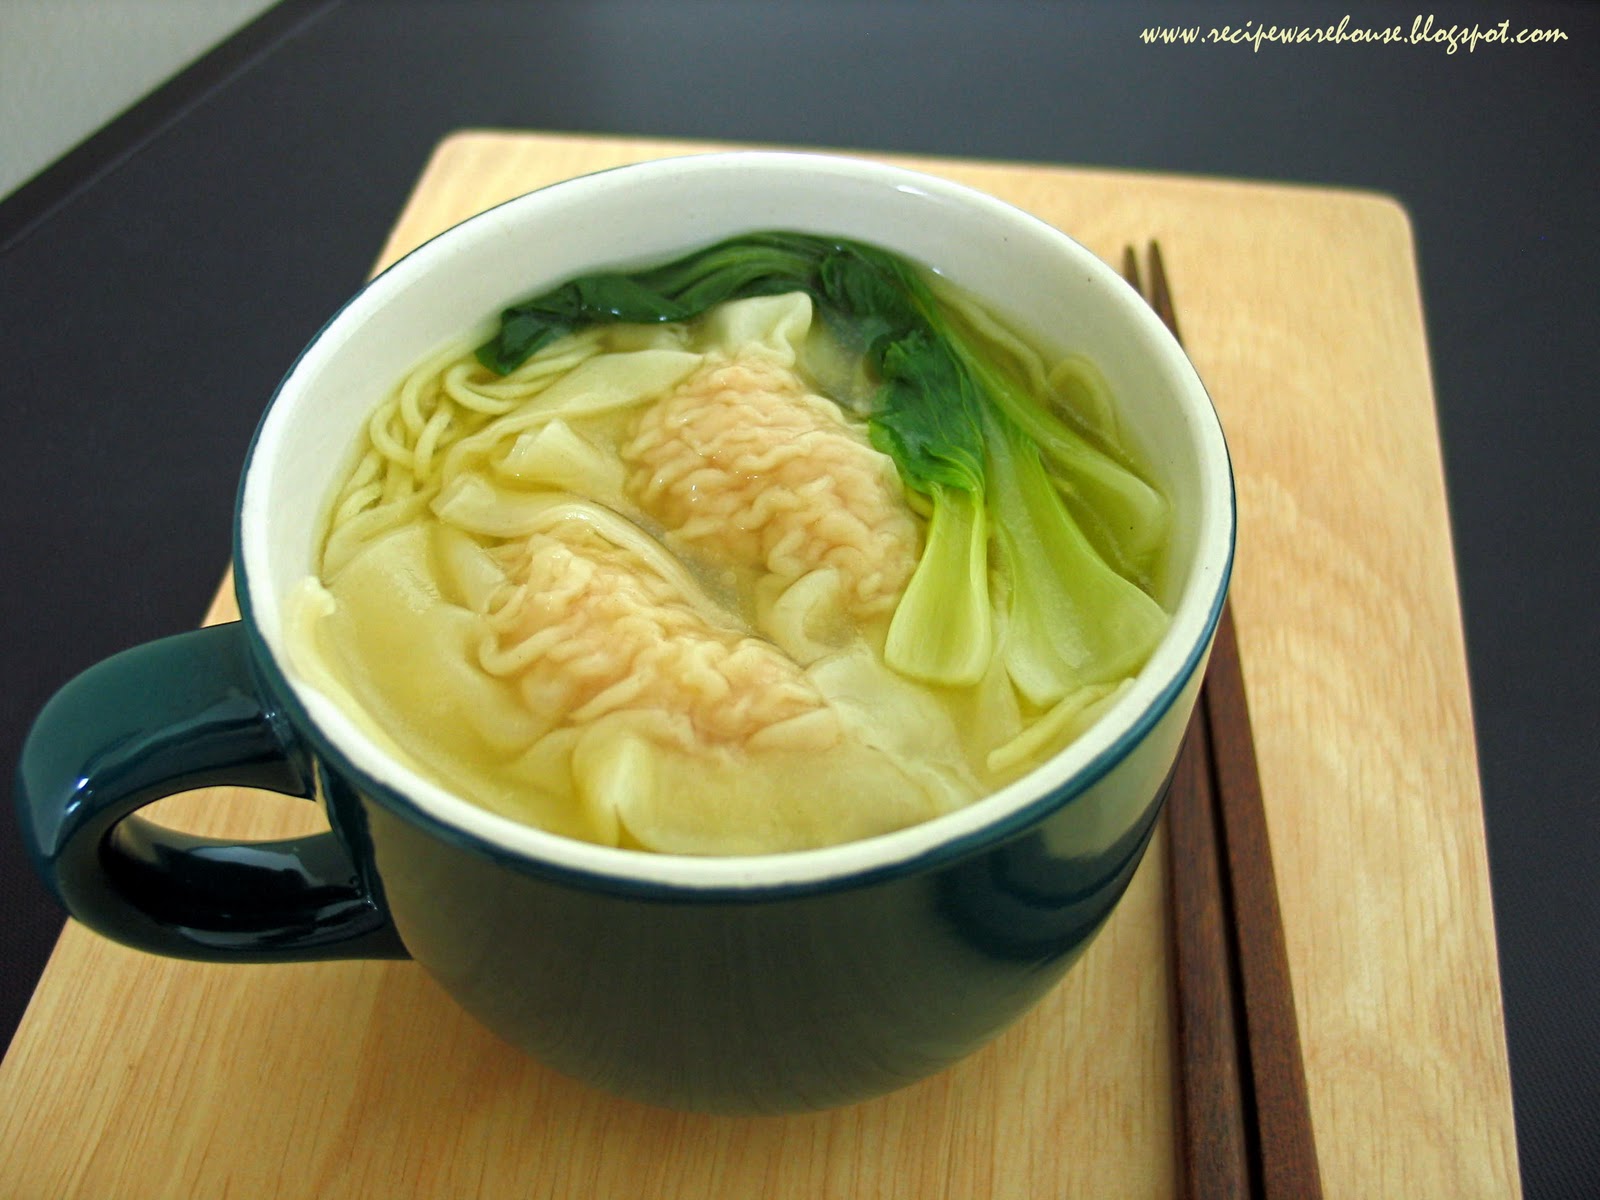
"Braised Ee-Fu noodles is a typical noodle dish served towards the end of a Chinese wedding banquet."

Sunday, November 28, 2010 at 10:38 PM
Posted by Vivian in
Beef,
Pie,
Potatoes

It has indeed been a while since an entry was made for this blog. Didn't even realise that I had taken such a long break. Too much had happened both at work and at home, zapping all ounces of energy away from me.
The thyroid surgery in October was the biggest culprit. I spent the immediate days following the operation mostly in daze, subsequently the lack of voice projection frustrated me to no end and which left me not in the mood for anything except to get through the days doing the bare necessities. The kitchen was still the place where I spent part of my weekends at. The family continued to get food laid before them but each time after whipping up a storm, I only wanted to get down to the eating part. Hopefully in the days to come I will remember to recreate the dishes that I had some success in for the last few months.
Two months on after the surgery, I thought to myself that it was probably high time for me to build up the momentum again and get back to doing other things that didn't quite fall under the "bare necessities" category. So here I am ready to bring on the the main lead of this post.
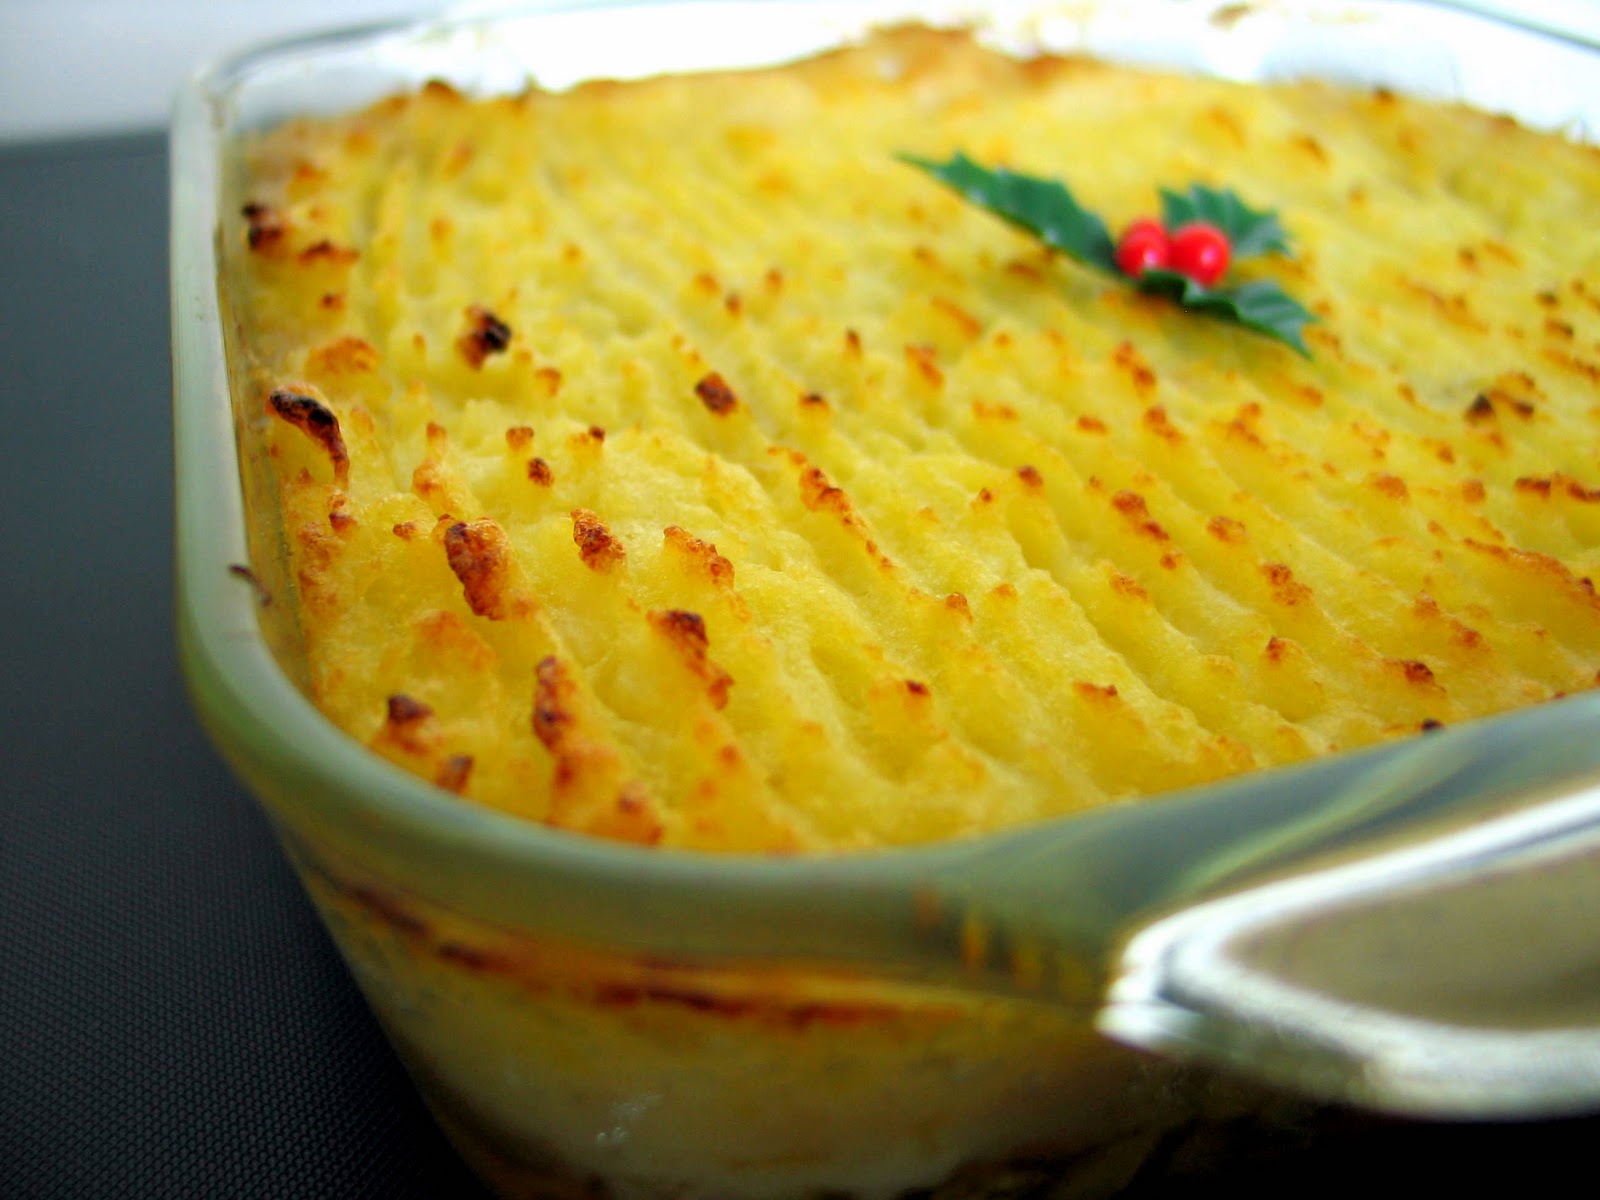
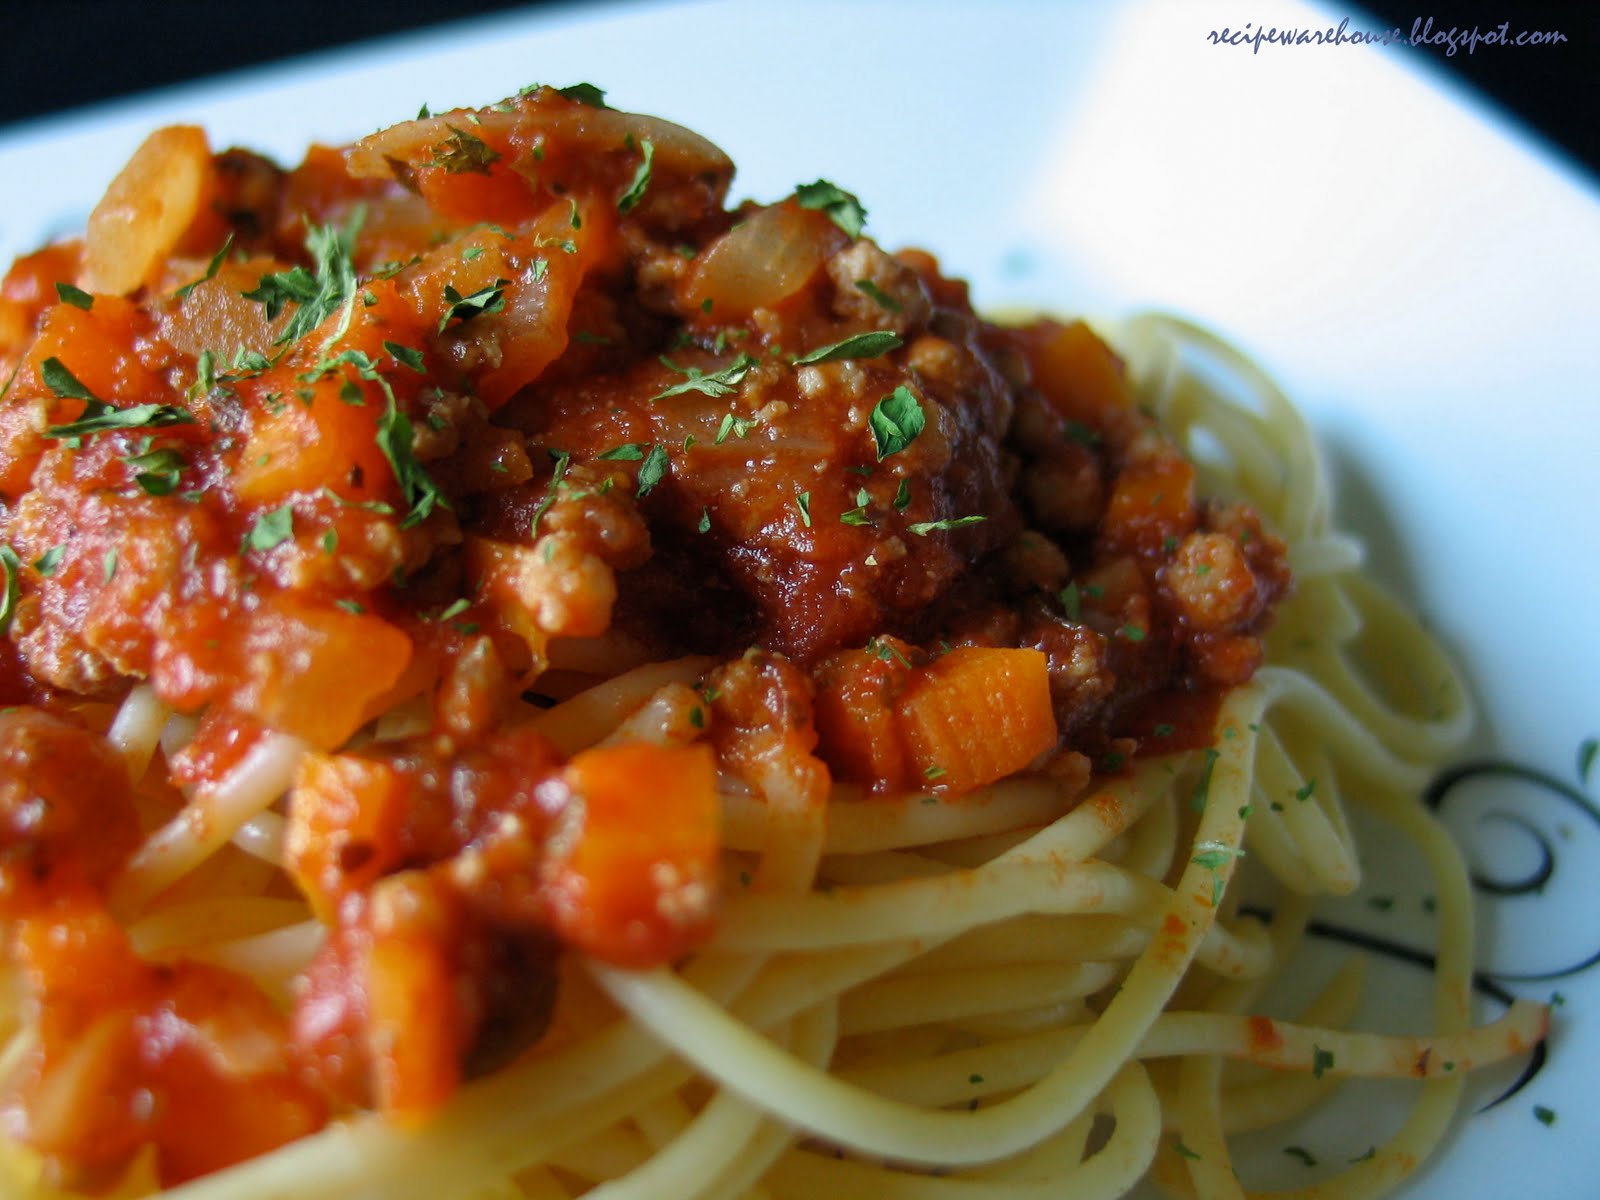
Cottage Pie was something that I had wanted to attempt to conquer almost a year ago for Christmas. I was cajoled to give it a go because a colleague of mine claimed that this is a very simple and easy to make pie, and partly because I was so inspired by the yummy Cottage Pie I had during a Christmas luncheon in office. Well, sadly it didn't happen for some unmentionable reason (think procrastination!) and so a year on, I finally cranked my engine and got moving... and I have to disagree with my colleague, because it took me 2 hours to put together the entire thing and I don't know how she could have classified this as simple. Nonetheless it was still very delicious.
Cottage Pie - a beef version of Shepherd's Pie, is typically eaten during Autumn / Winter season. After having fed the entire family with just a small portion and still had another serving left behind, I can understand why that is so. A little does go a long way.
Ingredients:
- 500gm minced beef
- 1 stick of carrot (cut into small cubes)
- 10 button mushrooms (sliced thinly)
- 2 cloves of garlic (minced)
- 1 medium-sized onion (cut into small cubes)
- 300ml beef stock (or chicken stock as substitute)
- 2 teaspoons of worcestershire sauce
- 1 teaspoon of grounded thyme (can be replaced with other types of herbs)
- 1 tablespoon of plain flour
- 5 large-sized potatoes
- 1 large knob of butter
- 4 tablespoons of milk
Preparation:
- Bring a big pot of water to boil and place potatoes in ensuring that all potatoes are covered.
- Cook potatoes till soft (about 20 minutes).
- Peel potatoes while still warm and mash potatoes with butter and milk. Set aside once done.
- Heat 1 tablespoon of oil in pan and add garlic.
- Once the garlic turns fragrant, add onion to pan and continue to stir until the onions turn translucent.
- Add carrot and let cook for about 5 minutes.
- Add button mushroom to mixture, and follow by minced beef, breaking all lumps.
- Once the beef is almost done, season with worcestershire sauce and grounded thyme. Stir to mix well.
- Pour in stock and cover pan to let simmer for 15 minutes.
- Turn on oven and set to 190 degree Celsius.
- Season with salt to taste when mixture thickens.
- Remove from heat and transfer content to a oven-proof deep dish.
- Top mixture with mashed potatoes and brush top with some melted butter.
- Using the back of a fork, create lines across mashed potatoes.
- Shove into oven and let it bake for 30 minutes, until the top browns nicely.
Number of Servings: 4
"Celery, peas, corn, tomatoes can be added as variations to this dish. Other herbs like oregano, parsley can be used to substitute thyme."

Sunday, August 22, 2010 at 10:36 PM
Posted by Vivian in
Italian,
Pasta
I Don't deny that I have been having quite a fair bit of "mishaps" in the kitchen lately. For some odd reason I seem to over-season my dishes these days making it way too salty to swallow. The worst case was that I mistook salt for sugar 2 weeks ago and added 1 tablespoon of salt to my stir-fried macaroni when it should have been sugar. At that point I couldn't figure out the reason why it was so salty until 2 days ago when I was trying to refill my salt and whipped out the container which actually contained sugar. As I opened the lid and took in a sweet whiff, it hit me that I had added salt instead of sugar by accident.
After a few weeks of disappointment, I finally started to regain faith in myself all thanks to this sunny-looking pasta dish. Not only did the taste made me happy, peering through the camera lens when I took photos of it added on to the level of ecstasy. The only reason that made me really excited about wanting to put this post up as quickly as possible is the golden hue of this dish... so pretty and eye-catching. The speckles of green from the parsley brings the colour out even more.
The only mistake I made was to turn up the heat at the last minute because Elaina was whining and demanded lunch to be served immediately because she was hungry. The egg yolk started to set too quickly and turned out a little scrambled. Well... I guess it is hard to function under stress.
Ingredients:
- 400 gm penne pasta or spaghetti (cooked to al-dente, drained and set aside)
- 200 gm bacon (cut into strips)
- 4 egg yolks
- 175 ml heavy cream
- 175 gm grated parmesan cheese
Preparation:
- Heat up 1 tablespoon of olive oil and fry bacon for 5 minutes until crisp and brown.
- Remove bacon and drain away excess oil.
- Mix egg yolks, cream and parmesan cheese well in a large pot.
- Cook pasta till al-dente and once done, immediately transfer over to egg mixture in a few small batches, stirring it well each time to allow heat from pasta to warm up the egg mixture slowly to prevent it turning into scrambled egg.
- In case of doubt that egg mixture is undercooked, simmer pot of pasta over low heat as a final step.
Number of Servings: 4
Friday, July 30, 2010 at 12:09 AM
Posted by Vivian in
Chicken,
Chinese
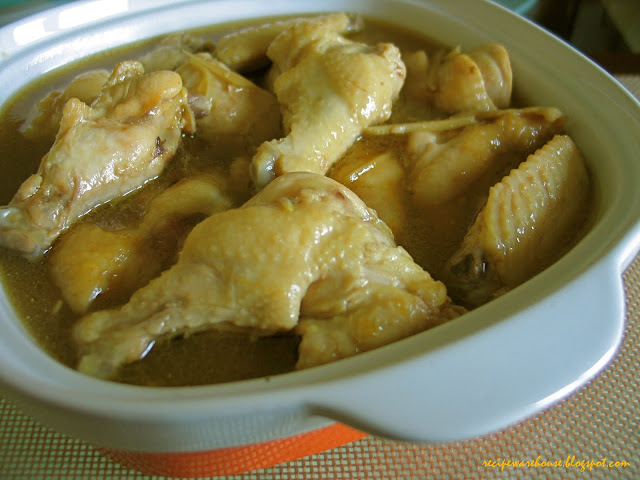
It has been a really busy month both at home and office and I am making use of that as an excuse for taking so long (like almost 4 weeks) to post this up.
Well at least that is just one of the "reasons". Partly also because I wasn't quite motivated to keep this recipe. There is nothing wrong with this dish, I adore it because it is so flavourful and sesame oil itself is a good enough reason to make me want to eat it over and over again. I go crazy over sesame oil to the extent that I can have a bowl of porridge covered with sesame oil resembling an oil slick or my chee cheong fun overdosed with sesame oil, and people around can feel so grossed out just by the sight of it.
Unfortunately, I have my suspicion that heating sesame oil over fire gives Elaina a bad cough and which was what happened on that fateful day when I made this. She couldn't stop coughing for a few hours and it went on until after the house was thoroughly aired. She had a similar episode once in an eatery not too long ago and we couldn't quite figure out the reason. My guess now is that sesame oil is the suspect here. She is fine if the sesame oil is added as an ingredient but not when used in place of cooking oil.
I reckon it will be a while before I attempt this again. Probably when Elaina is slightly older and her airway is less sensitive, or when she becomes a mother and I need to make this as a confinement food for her LOL.
This recipe originated from
Rasa Malaysia, and reproducing it here for easy reference. The only tweak I made was to add some cornstarch towards the end to thicken the sauce slightly. As usual, I like my dish to be more saucy than normal.
Ingredients:
- 3 chicken drumsticks (chop into 3-4 pieces each, bone-in)
- 2-3 inches knob of ginger (peeled and cut into thin strips)
- 1 1/2 tablespoon soy sauce
- 1/2 tablespoon oyster sauce
- 1 tablespoon Shaoxing wine or Chinese rice wine
- 2 tablespoons sesame oil
- 1/2 cup water
- 3 dashes white pepper powder
Preparation:
- Heat up a wok over high heat and add the sesame oil.
- When a swirl of smoke appears from the wok and the oil is fully heated, add the ginger strips and stir fry until light brown or aromatic.
- Add chicken to the wok and stir fry for about 10-15 seconds before adding the soy sauce, oyster sauce, wine, and white pepper powder.
- Continue to stir-fry until the chicken is 70% cooked. Add water and do a few quick stirs.
- Cover the wok with the lid and turn the heat to medium to low heat and let the chicken cook for a few minutes or until the sauce thickens and the meat becomes tender.
Wednesday, June 23, 2010 at 10:32 PM
Posted by Vivian in
Chinese,
Vegetable

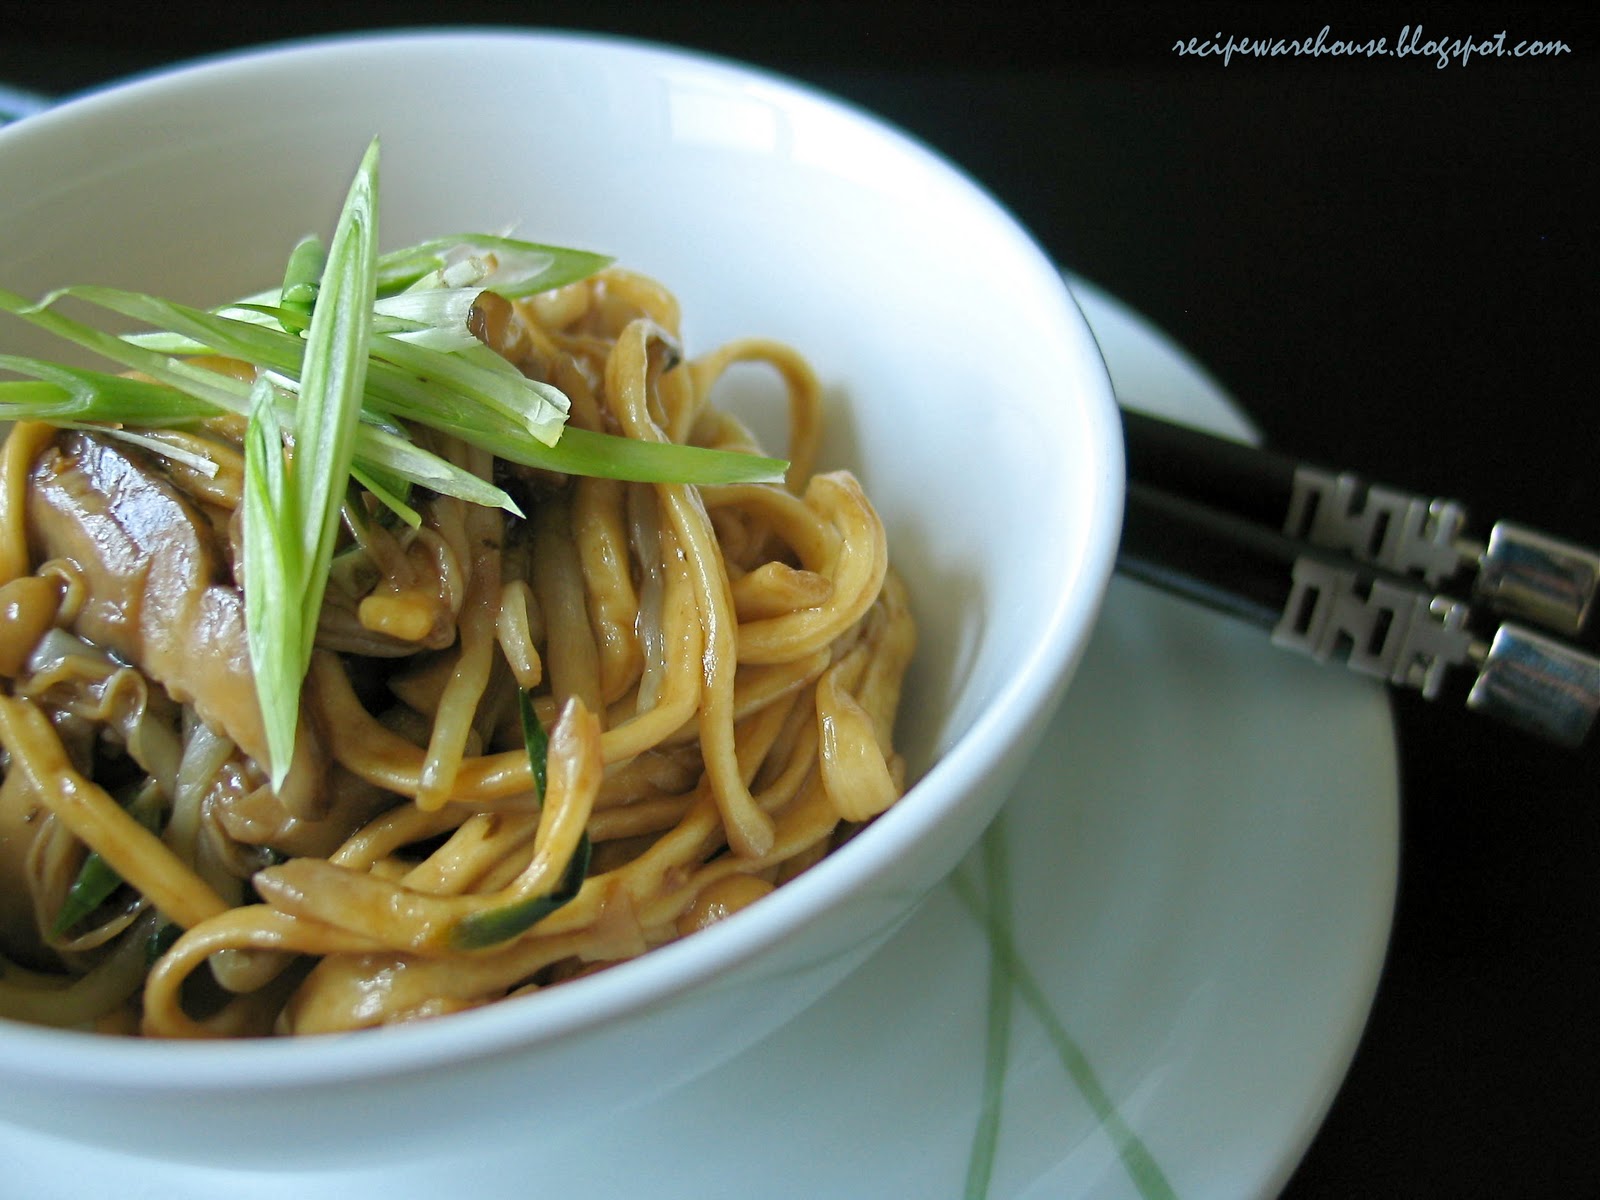
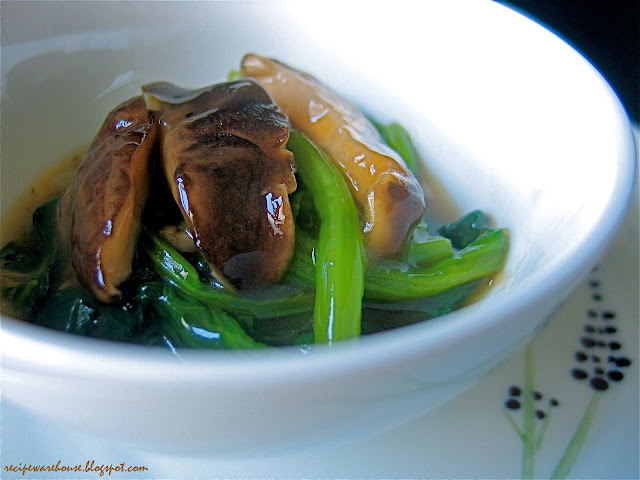
Each time I go on vacation, the first thing I start to miss is stir-fried vegetables, Chinese style. While I am ok with salads, I tend to get sick of it after eating for 3 days in a row. No matter how many types of different salad dressings we can possibly find, the baseline is that it still tastes raw. My Asian palate is too used to the garlicky green leafy vegetables. When I got back from the recent vacation in Japan, the first thing I did the next day was head down to the supermarket for a big bunch of bak choy and stir-fried it with garlic for dinner, just to satisfy my craving that had been suppressed for days.
As far back as I can remember, the usual stir-fried vegetables that my mum will serve (and same goes for my mum-in-law) are either bak choy, spinach or choy sum and they are all done the same way – garlic with light soy sauce. I tried to come up with a slightly different sauce the other day for my stir-fry and I quite like how it turned out. It reminded me of the spinach with abalone mushrooms we normally get at a Chinese wedding dinner.
Ingredients:
- 500 gm spinach (cut into 3-inch length)
- 3 cloves of garlic (minced)
- 10 shitake mushroom (sliced thickly about 1-cm wide) *Fresh or dried can be used. For dried shitake, soak overnight before use
- 1 tablespoon oyster sauce
- 1 tablespoon light soya sauce
- ½ tablespoon sesame oil
- 1 level tablespoon corn flour (or chestnut flour)
Preparation:
- Mix oyster sauce, light soy sauce and sesame oil with 150 ml of water. Stir to combine.
- Mix corn flour with 100 ml of water.
- Heat oil in wok. Add in half of the minced garlic and stir-fry until fragrant.
- Throw in mushrooms and stir occasionally.
- When the mushrooms are almost done and juices start to run, add in sauce mixture and let it simmer for 4 to 5 minutes. The sauce will thicken slightly.
- Remove mushrooms and sauce.
- Using the same wok, heat another tablespoon of oil and stir-fry the balance minced garlic until fragrant.
- Add in spinach and stir-fry continuously.
- Return the mushroom and sauce to wok when the vegetables are just about to be cooked.
- Lower heat and add in cornstarch.
- Remove from heat when the sauce turns clear and thickens.
Tuesday, June 15, 2010 at 11:14 PM
Posted by Vivian in
Beef,
Pasta
The blog is starting to grow moldy due to the lack of updates. It has been so neglected that I didn’t even realize that the formatting has got haywire and needed some adjustments, until late last week, which then took me another few days to set it right. The thumbnail on the homepage is still not back to what it was. Clicking on it doesn’t link to the post but a bigger-sized photo. I can’t remember how I had revised the html back then and I couldn’t find the old post by a someone, somewhere detailing how to do it. I’m too lazy to squint my eyes sieving every line and go through a trial and error process… so I think I will just have to live with it for now until I am “inspired” to do something about it.
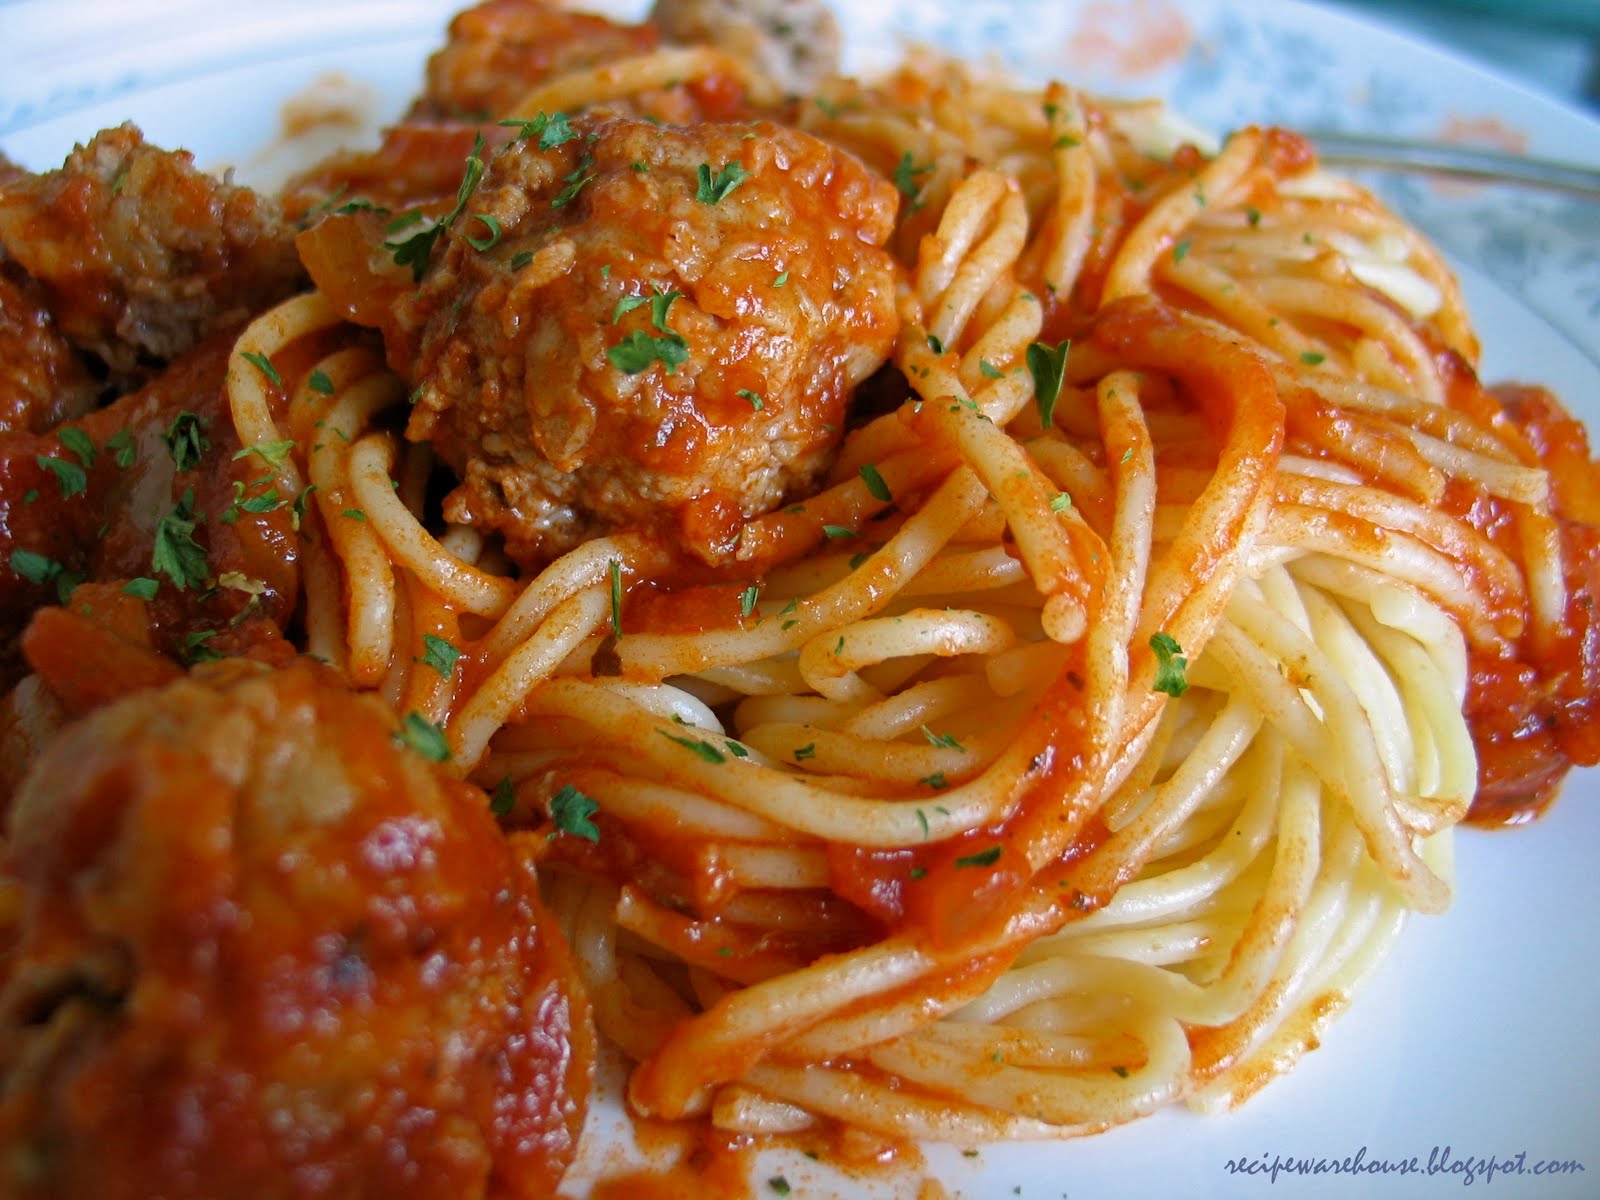
Since we got back from our family vacation, I have been revisiting all the old recipes. Sadly, even though I had practiced hard to make the recipe perfect in the past, I have failed to continue to practice to stay perfect. Not just the recipe, but the food porn (like the one up there!) is starting to look a bit messy. Will it sound a little too lame if I shift the blame to the not quite photogenic meatballs??
Whatever it was, I finally got my act together last weekend and made something different because I have gotten too used to throwing in the usual suspects each time someone in the family requests for pasta (ABC pasta to be exact!). So I went through my recipe books late one night and persuaded myself to try my hands on making meatballs. The ingredient list didn’t look too complicated, which is always a push factor for me to want to try but I definitely underestimated the amount of time required to prepare the meatballs.
The taste was there but not quite the texture of the meatballs and I blame in on my over-confidence where preparation time is concerned. It was nearing lunch time and I was still buzzing around the kitchen not ready to fire up the stove. PANIC!
In the end, I was only working towards getting the minced beef ball-like looking neglecting the texture. It turned out that the meatball didn’t hold well together and breaks apart with just a light touch. Better luck next time… hopefully.
- 500 gm minced beef
- 1/2 onion (minced)
- 2 teaspoons dried oregano
- 1 teaspoon worcestershire sauce
- 3 tablespoons plain flour
- 2 tablespoons olive oil
- Tomato based pasta sauce
- 500 gm spaghetti (cooked according to instructions on packing)
- Combine minced beef, onion, dried oregano and worcestershire sauce. Season to taste with a pinch of salt. Mixed ingredients well using hands.
- Roll level tablespoons of the mixture into balls and dust lightly with plain flour, shaking off excess.
- Heat olive oil in pan and cook meatball in batches, turning often until browned all over.
- Transfer meatballs into heated pasta sauce and allow to simmer for 10 to 15 minutes.
- Serve over spaghetti.
Thursday, March 25, 2010 at 11:27 PM
Posted by Vivian in
Italian,
Pasta
I have been ignoring my blogs for the past few weeks because I was doing a 3-week non-stop "dramathon". 129 episodes of Korean drama, Cruel Temptation kept me busy every night after the kids had gone to bed. It is very unusual of me to get hooked to the television. On an average I only watch one drama a year. Shan't go into the detail or make a full review here of why this show can keep me a non-tv addict up to 2, 3 am even on a weeknight. It is probably the same reason why this show can beat another Mediacorp drama airing at the same time belt.
After the 3-week "dramathon", I took the following few nights to catch up on my sleep. I noticed that in the last 3 weeks, my concealer wasn't doing its magic every morning because the dark eye rings were so bad due to the lack of rest (but hack, I had to press on and get to the end of the show). Plus I needed to recoup the sleep that I lost before we fly off for our family holiday in Japan next week.
The good thing that came out of the "dramathon" is that I managed to wean off my nightly addiction to the Bejewelzed game on Facebook. One addiction in exchange for another? Hmmm....
Back to food... this was what I made for the family weeks ago (ermm can't remember when exactly). Instead of making the tomato paste from scratch I relied on the ready-made jar type. Till now I still don't think it is worth my time and effort to whip up one pot of sauce just for our occasional pasta fix. Cream sauce on the other hand is comparatively less of a hassle.
Ingredients:
- 500 gm spaghetti (pre-cooked)
- 2 garlic cloves (finely minced)
- 1 large onion (finely chopped)
- 1 carrot (finely chopped)
- 1 stalk of celery (finely chopped)
- 50 gm bacon (finely chopped)
- 500 gm minced beef
- Tomato based pasta paste
Preparation:
- Heat oil in large deep saucepan. Add garlic, onion, carrot, celery and bacon and cook. Stirring occasionally over medium heat until ingredients soften.
- Add minced beef to saucepan, breaking up any lumps. Cook until the beef browns.
- Add in tomato paste (to desired consistency) and allow sauce to simmer.
- Serve sauce over pasta.
Number of Servings: 4
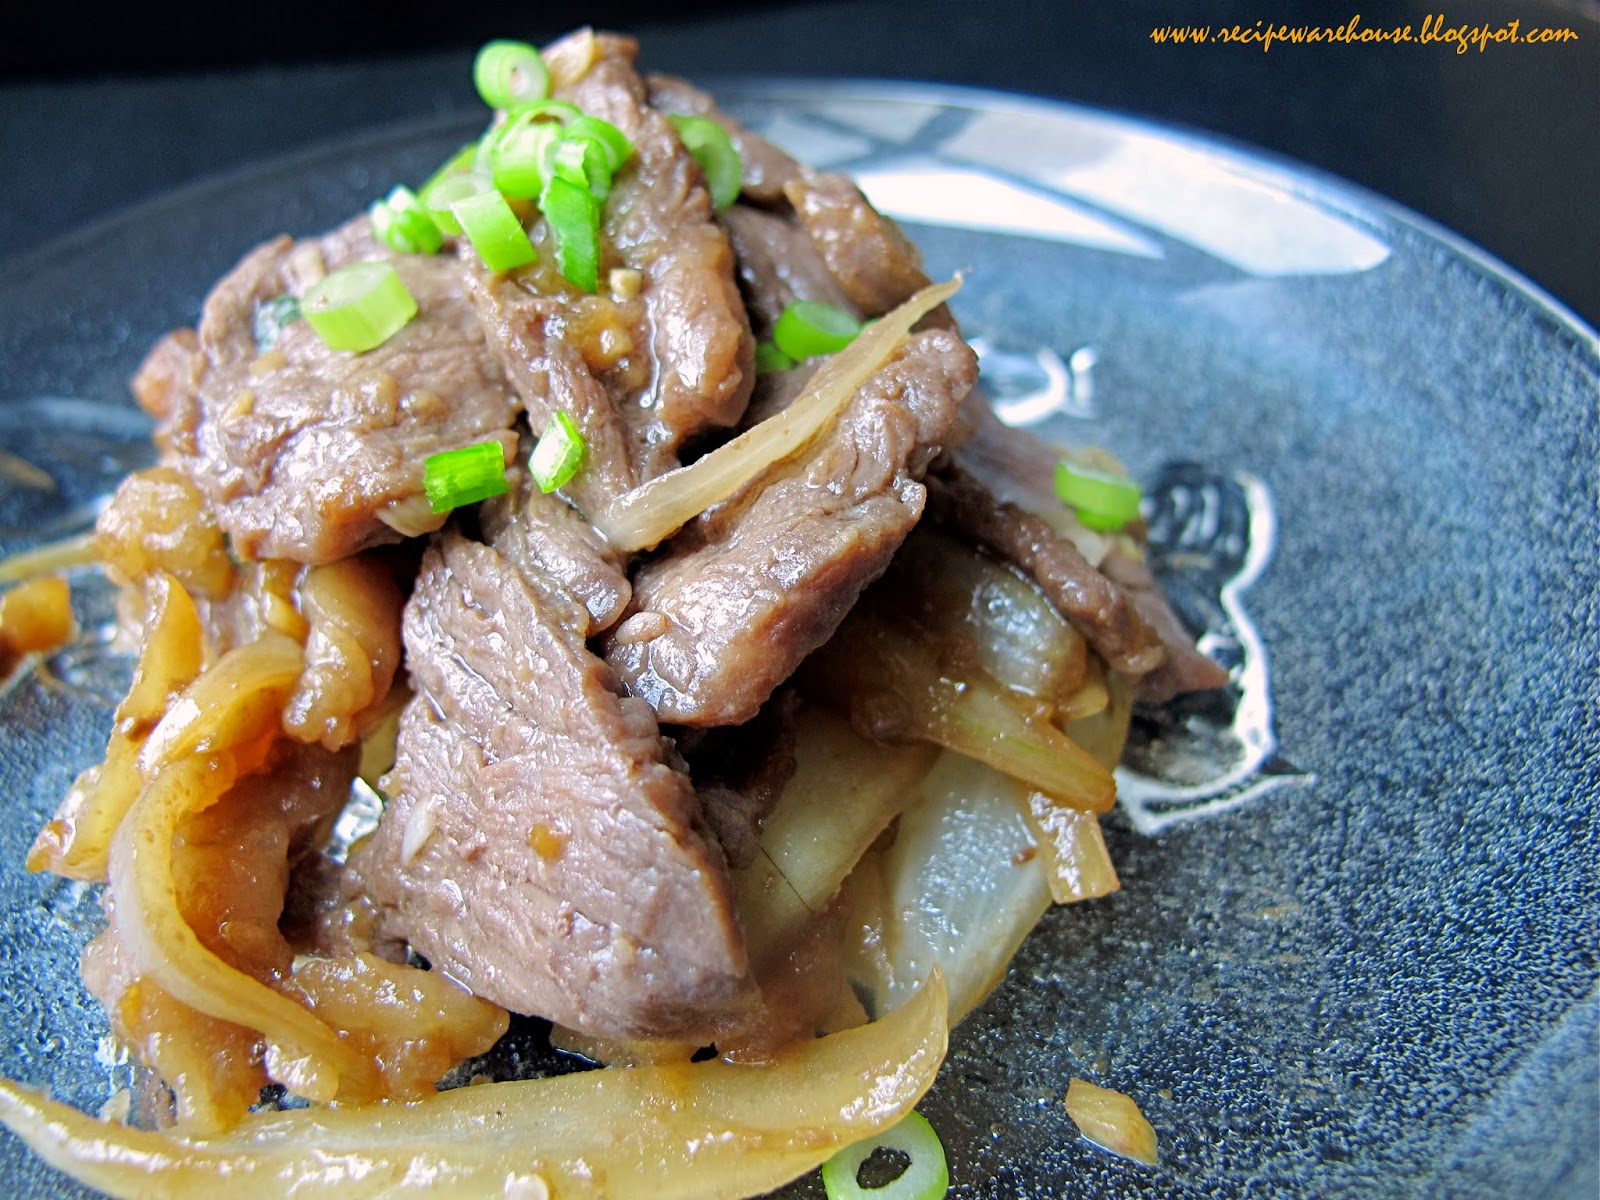
Sunday, February 28, 2010 at 11:37 PM
Posted by Vivian in
Beef,
Chinese
I was first "introduced" to
Kylie Kwong by Cathy. Not a physical introduction but more like I got to know about this Australian Chinese chef, TV presenter, restauranteur cum cookbook writer when Cathy got me one of Kylie's cookbook for my last birthday. I got my hands on another book of Kylie Kwong while doing Christmas shopping a few months ago.
This time round it was a back to basic cookbook on Chinese cuisine. The recipes are no where near fancy but more day-to-day dishes that our mothers put on the dining table. While it is easy to find a gazillion food blogs for simple recipes like these, it is one in a million to get a book written by a true professional on elementary stuff for ordinary people like me whose only desire is to put together a decent home cooked meal for the family.
Even though it was a very basic dish, it took me 2 tries to get this one right (I am that dumb!). I had sliced the beef to 1 cm thick was instructed by the book but somehow the meat turned out to be too chewy. I am certain that I must have done something wrong during the frying process but I couldn't pin my finger on the exact cause. At least the taste was there and sufficient to nudge me to attempt a second try. This time, I sliced the beef real thin and seasoned with cornflour. I happily declared victory when I took the first bite.
To get a thicker consistency of the sauce, I had added cornstarch instead of just water and the broccoli (which was really because Matty had requested that I cook some for him this weekend) turned out to be a great garnish because we could use that to dip into the sauce and clean out the whole plate.
Ingredients:
- 500 gm beef (sliced thinly)
- 6 slices of ginger (can be julienned as well)
- 3 cloves of garlic (minced)
- 1 medium-sized onion (cut into think wedges)
- 4 to 5 stalks of spring onion (cut into 1-inch long)
- Cornflour
- Light soy sauce
- Malt vinegar
- Shaoxing wine
- Oyster sauce
- Sugar
- Sesame seed oil
Preparation:
- Marinate beef with 2 tablespoons of Shaoxing wine, 2 tablespoon of light soy sauce and 2 teaspoon of cornflour for 30 minutes.
- In the meantime, mix together 1 1/2 tablespoon of oyster sauce, 1 1/2 tablespoon of light soy sauce, 1 tablespoon of sugar, 1 tablespoon of malt vinegar, 1 tablespoon of Shaoxing wine and a dash of sesame seed oil.
- Using another bowl, mix 100 ml of water to 2 teaspoon of cornflour and set aside
- Heat wok with some oil and stir-fry half of the beef for 30 seconds and remove from heat. Stir-fry the other half of the beef likewise. (I like to remove beef when it is still a little pinkish to avoid overcooking when it gets returned to the wok)
- With the same wok, heat up more oil and stir in onion, ginger and garlic until the onion starts to brown.
- Add in sauce mixture and let it simmer slightly.
- Place beef back into wok , giving it a quick stir.
- Low the heat slightly and add in spring onion and cornflour mixture. Mix well.
- Remove from heat as soon as the sauce starts to thicken and while the beef is still tender.
Number of Servings: 4
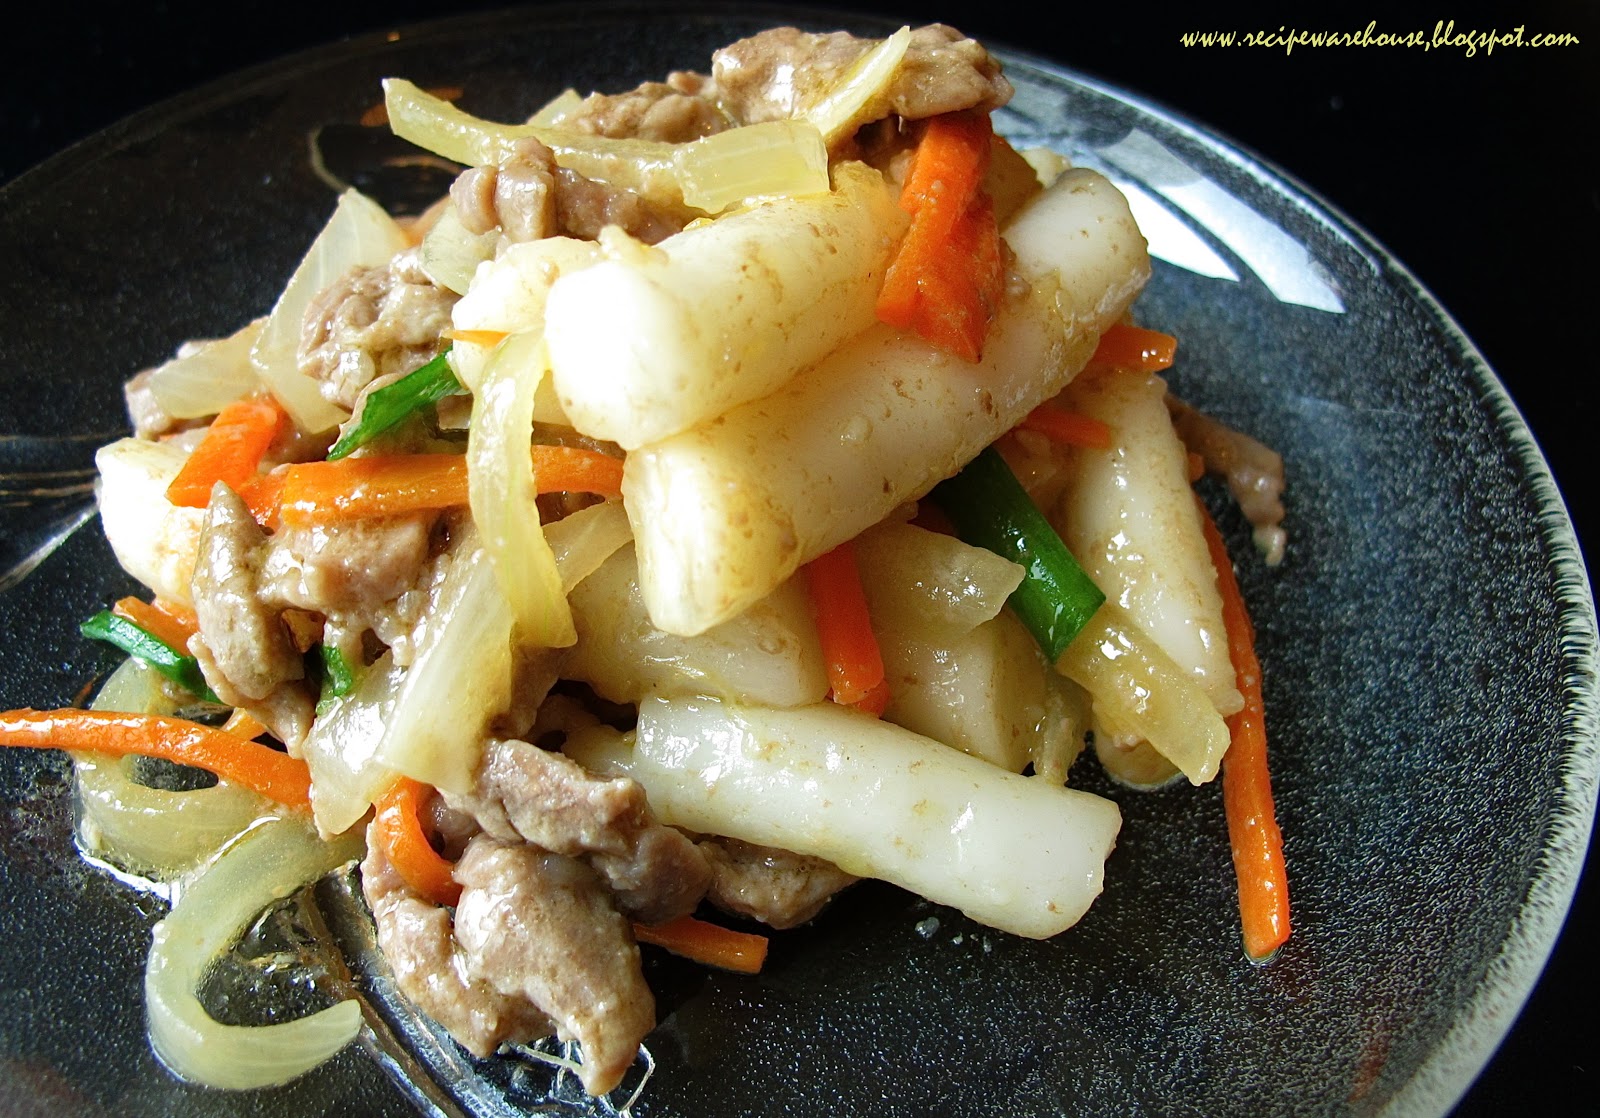
Sunday, February 7, 2010 at 11:51 PM
Posted by Vivian in
Chinese,
Rice
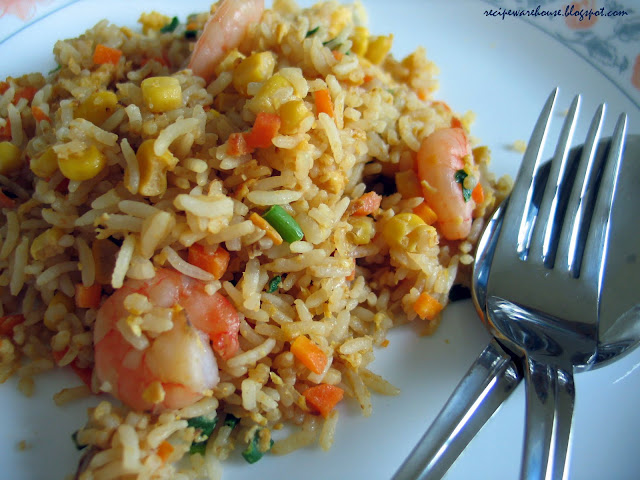
In an attempt to simply things, I made some changes to the
Shrimp Fried Rice recipe (or more like I rewrote it). These were the steps...
- Marinate shrimps with light soy sauce and cornflour for at least 30 minutes.
- Heat wok with oil.
- Stir in garlic and fry till fragrant.
- Add in diced carrots.
- When the carrots are partially cook, throw in corn kernels and stir lightly.
- Add shrimps to wok.
- As soon as the shrimps are cooked, remove from wok and set aside.
- Pour in beaten egg and allow it to set partially.
- Add it pre-cooked overnight rice and chopped spring onions.
- Mix all ingredients thoroughly.
- Season with light soy sauce, dark soy sauce (optional) and sesame oil.
- Return shrimps to wok and give it a final stir to mix well.
Although the shrimps didn't have the pan-fried taste to it, it tasted just as good. I think I will stick to this recipe from now on. Ok... I admit that I am just lazy!
Sunday, January 3, 2010 at 11:20 PM
Posted by Vivian in
Chicken
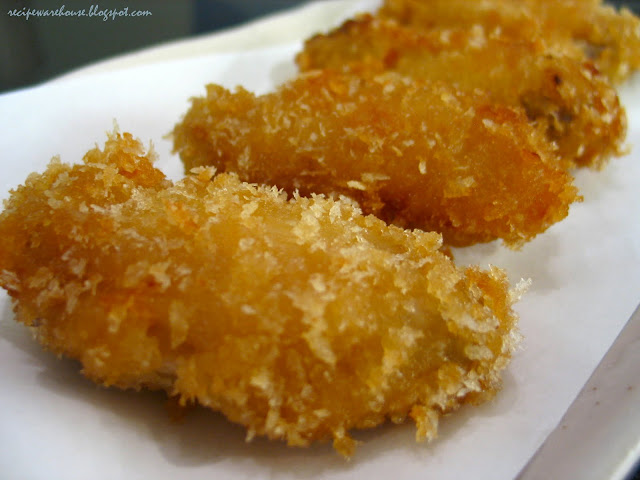
Today would had been described as a "perfect day" by Matty. McDonalds' for breakfast, trip to the zoo, chicken rice for lunch and fried chicken wings for dinner. Although it wasn't deliberately planned to be so, it is surely a good way to make up to him for the sufferings he went through the last weekend due to his gastric flu. But his poor mummy had been up on her feet (literally) since 8.30 in the morning, except during meal time and the car ride between home and zoo, and back. Only managed to put up my swollen legs at 10 in the evening.
Few weeks back we took the kids to Billy Bombers for dinner to celebrate Elaina being off diaper and to reward them for their well behaviour. Instead of the usual fish and chips, the kids chose chicken and so we ordered a Honey Stung Chicken for sharing. The portion as always was big. 2 thighs, 2 drumsticks, 1 big pile of fries and a bowl of coleslaw. Just nice to feed Elaina, Matty and still enough for myself. The taste of the chicken was really unique - it was both savoury and sweet. It left me wondering if this is something I can attempt in my own kitchen.
And so I came back home, did some poking around the worldwide web but couldn't quite decide which was the right recipe to follow. The only thing I was sure is that the chicken is coated with honey instead of the usual egg. In other words the logical order should be flour, honey and crumbs.
I took the dive today without a recipe to follow and not knowing the outcome, but the first bite left me grinning from ear to ear. I can only admit that I was lucky.
Dinner was satisfying... in fact overly satisfying because I bought 16 chicken wings for 3 adults and 2 kids (I must be either out of my mind or too excited about trying my hands on this dish).
Ingredients:
- Chicken drumsticks, thighs, drumlets or mid-joints
- Light soya sauce
- Plain flour or self-raising flour
- Honey
- Panko, crushed soda crackers or dried breadcrumbs
Preparation:
- Marinate chicken with light soya sauce for at least 30 minutes
- First coat chicken with flour, then with honey and lastly with panko, soda crackers or breadcrumbs.
- Deep-fry chicken until golden brown.
- Drain off excess oil and serve hot.
Number of Servings: Dependent on quantity of chicken used and sanity level of the cook
Today was the first time I had used self-raising to coat the chicken instead of plain flour. According to my mum-in-law plain flour clumps after coming into contact with the chicken but not self raising flour. And so I took her advice. It really did make the coating process much easier... or at least the first step because I cannot say so for the honey as opposed to egg. It was so sticky that by the time I was done with the coating my fingers were so well-coated and looked as though they were ready to be fried.


.JPG)